


WebRTC API Landscape in 2024
January 26, 2024
4 min
Applying effects on the video stream such as funny eats or replacing the background is something that becomes more and more common. It uses WebRTC but not only: so the complexity is high. And not only because of the complex video pipeline to put in place but because performance could be tricky. The more you need to do complex treatments on the video stream the more you add latency and so you decrease the framerate.
This article tries to explain the basics as well as all the relation between all the components involved when building a video pipeline.
For that article, I used the following devices
Camera: Razor Kiyo which has an autofocus
Microphone: Rode NT-USB Microphone which works in stereo


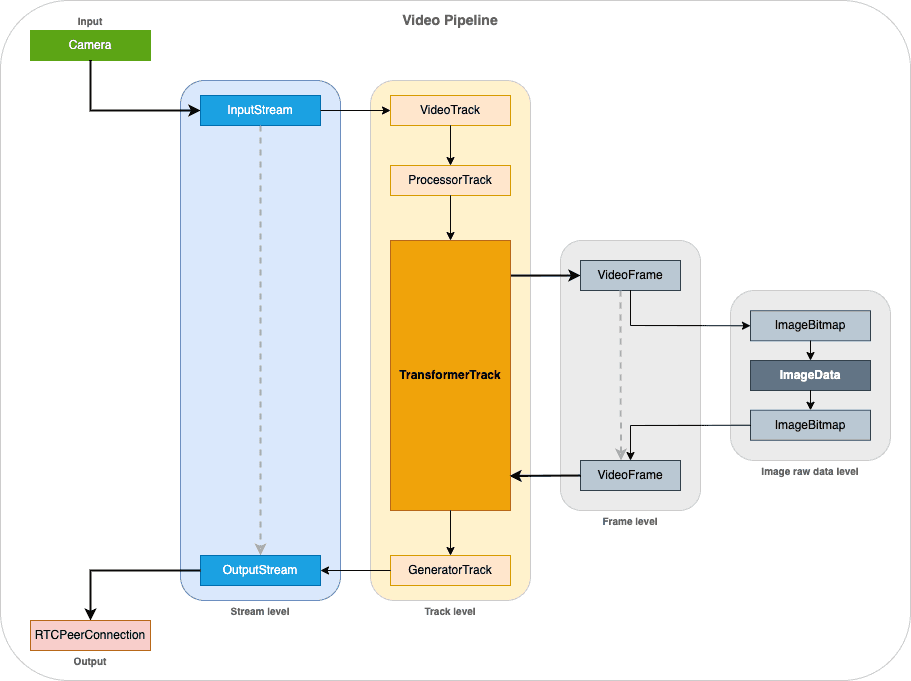
A Video Pipeline is a set of components that transport the video stream from a source to a destination and where each component plays a specific role.
Components involved in a video pipeline come from WebRTC and are recent but the video pipeline in fact use a lot of different components: HTMLCanvasElement, HTMLVideoElement, Image, ImageBitmap, ImageData, etc…
The WebRTC basic video pipeline involves a camera which captures a video signal and transforms it to a MediaStreamTrack, and a RTCPeerConnection, that takes that video track and sends it to somewhere.
Today, it is interesting to understand how to create and use a sophisticated pipeline to do what you want on that video stream: Pipelines can be used to analyze the video (eg: detect a fire, a movement, etc…) as well as to change its content (eg: funny hats, blurring or changing the background, aggregate, mix, etc…). But not only, the pipeline can be used to encrypt and decrypt video frames too.
An equivalent exists for the audio stream which is an Audio pipeline and mostly based on WebRTC + the Audio APIs.
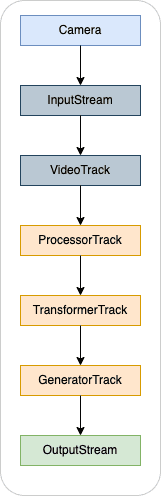
To start playing with the video, we can create a first basic pipeline that put in place the main components involved but without changing the content of the video.
In order to do that, we need 3 things:
Here is a very basic video pipeline that just “intercepts” the video frames, sends them to a transformer that do nothing at that time excepts enqueuing these frames. Then, the transformer exports an output track that can be viewed through a MediaStream object using a <video> DOM element.
// Create the Processor for reading the streamconst processor = new MediaStreamTrackProcessor({track: aVideoTrack});// Create the Generator for reassembling the streamconst generator = new MediaStreamTrackGenerator({ kind: 'video' });// Create the Transformerconst transformer = new TransformStream ({async transform(videoFrame, controller) {controller.enqueue(videoFrame);},flush(controller) {controller.terminate();}});// Create the pipelineprocessor.readable.pipeThrough(transformer).pipeTo(generator.writable);
As the generator is in fact a video track, we can create a stream for viewing the result in a <video>
// Get the Video DOM elementconst processedVideo = document.querySelector("#video");const processedStream = new MediaStream();processedStream.addTrack(generator);processedVideo.srcObject = processedStream;
You should see the same video as the one extracted from the camera.
Note: I was interested to compute the framerate of the processed video. On my computer (M1), I didn’t succeed to have more than 20-21 fps for my video in 640x480. The Transform method was called at least every 47ms even if the original video had a framerate of 60 fps.
To summarize, the flow is the following
As we have now our first pipeline, we need to go deeper to the Transformer for modifying the frames.
The Canvas element plays a central role in that puzzle because it allows to access to each pixel of a frame. Having access to pixels, is the door to do every treatments on that video.
Accessing the pixels can be done like that:
// First step is to create an ImageBitmapconst bitmap = await createImageBitmap(videoFrame);// Then to draw the bitmap on the canvasctx.drawImage(bitmap, 0, 0, bitmap.width, bitmap.height);// And finally to extract the pixels from the canvasconst imageData = ctx.getImageData(0, 0, bitmap.width, bitmap.height);
So, with that code, we do the following step:
![]()
Now that we have an ImageData, we can do any treatments on the video data. One of the common cases is to replace the current background by a virtual one. The following example uses TensorFlow and BodyPix with pre-trained models that are able to recognize a person in an image.
// Segment the image and detect the person using TensorFlow & BodyPixconst segmentation = await net.segmentPerson(imageData);// Prepare our new image containing the virtual background (= a new image)ctx.putImageData(background, 0, 0);// Get the data from the virtual backgroundconst newImg = ctx.getImageData(0, 0, 640,480);const newImgData = newImg.data// Copy only the pixels representing the person to the virtual backgroundsegmentation.data.forEach((segment, i) => {if(segment == 1) {newImgData[i * 4] = imageData.data[i * 4]newImgData[i * 4 + 1] = imageData.data[i * 4 + 1]newImgData[i * 4 + 2] = imageData.data[i * 4 + 2]newImgData[i * 4 + 3] = imageData.data[i * 4 + 3]}});
Note: This example is just to show how to deal with the image content. It is not optimized and looks a bit weird. In fact, it depends on the BodyPix and TensorFlow parameters as well as with the integration of the person in the virtual background. BodyPix has a specific function such as drawBokehEffect that enhances the result and that can be used without having to develop the pipeline.
Once we did our treatment, we can export the image to a new frame that will be enqueued in replacement of the original one.
// Store the timestamp of the current frame;const timestamp = videoFrame.timestamp;// Once we got the image from the frame, we need to close itvideoFrame.close();// After the new image has been drawn, we can export the resultconst exportedBitmap = await createImageBitmap(newImg);// And generate a new frame from that ImageBitmapconst generatedFrame = new VideoFrame(exportedBitmap, {timestamp});// Enqueue that frame, instead of the initial videoFramecontroller.enqueue(generatedFrame);
We can summarize that part like that
![]()
As seen in the previous paragraph, the complete pipeline includes a lot of components. We can summarize it like in the following
As mentioned, the more you analyze or make changes to the video frame, the more you can add extra latency to the pipeline and so decrease the framerate. Here are some points that can help keeping a “low latency” pipeline.
Resolution of the image to treat is one of the key factor. So be careful when having high resolution frames. Sometimes, it is better to downscale the image resolution before applying the treatment. Because, most of the time, there is no miracle, you need to parse every pixels of the image…
The HTMLCanvasElement and its canvas rendering contexts (‘2d’ or ‘webgl’) are where a part of the “magic” happens. The pipeline interacts a lot with the Canvas element. This is the “material” where all the operations on the image are done. For example, you can apply complex operations on the image using the globalCompositeOperation. It is important to deduce from your need, the minimal operations to do.
It takes time to have in mind the right path of all operations to do on the Canvas element. But doing too many operations can also lower the result in terms of performance even if operations done on the Canvas element are very fast.
In order to not decrease the web application user experience by spending too much time dealing with the frames, an optimization is to do the job in a Web Worker. Except accessing to the DOM, a Web Worker can treat completely the video pipeline.
Here is an extract that creates a Worker and sends to it the Readable and Writable interfaces to deal with the video pipeline.
const worker = new Worker("pipelineWorker.js");// Create the processor and generatorconst processor = new MediaStreamTrackProcessor({track: aVideoTrack});const generator = new MediaStreamTrackGenerator({ kind: 'video' });// Access to the Readable and Writable interfaceconst readable = processor.readable;const writable = generator.writable;// Send this information to the Workerworker.postMessage({operation: 'initpipeline', readable, writable}, [readable, writable]);// Somewhere in your code, start the pipelineworker.postMessage({operation: 'start'});
From the Worker, you can get them and create the pipeline as well
// In pipelineWorker.jslet readable, writable = null;onmessage = async function(evt) {const operation = evt.data.operation;switch (operation) {case 'initpipeline':readable = evt.data.readable;writable = evt.data.writable;break;case 'start':const transformer = new TransformStream ({async transform(videoFrame, controller) {const current = videoFrame.timestamp;// Do your treatment// ...}});// Execute the pipelinereadable.pipeThrough(transformer).pipeTo(writable);break;}}
We can imagine spawning more threads (aka workers), each dealing with a part of the image to have tasks running in parallel on machine with multiple CPU cores (if supported by the system).
One of the complicated things when dealing with a Worker is that you can’t send what you want: It should be a Clonable at least and a Transferrable object.
Because, as the Worker is in a different context, you can’t pass reference from your main thread (main code). Data are duplicated (a clone is generated) or transferred (The context switches from the main thread to the worker thread).
The following objects are Transferrable (and so can be cloned):
But at the opposite, some JavaScript objects can’t be transferred nor cloned such as a MediaStreaMTrackProcessor nor a MediaStreamTrackGenerator. So, you can’t pass them to the Worker.
OffscreenCanvas is a Canvas that is detached from the DOM and that runs in a Worker. Its goal is to make the rendering out of the main thread to have better performance: The rendering doesn’t affect the application and the application doesn’t affect the rendering. For sure, this works thanks to our multiple CPU cores.
This sample creates an OffscreenCanvas and uses it in a worker
// In worker.js// Create a new OffscreenCanvas with a dedicated sizeconst offscreen = new OffscreenCanvas(640, 480);// Then we can get the context as in the traditional Canvas elementconst ctx = canvas.getContext("2d");// And draw like in the main thread - here we copy an ImageDatactx.putImageData(backgroundImageData, 0, 0);
Using WebAssembly is a way to speed up the pipeline by executing code at a speed equivalent to native.
And if I compare the samples I tested for virtual background, the result is completely different: On my machine, implementations based on Worker and JavaScript are often below 15 fps and integration of the virtual background is visible (some graphical glitches). Inference added by the pipeline could be more than 100ms which ruins the UX. In the opposite, implementations based on WASM can reach 20 or more fps depending on the resolution. In terms of quality, the integration is less visible (video is well integrated into the virtual background).
But WebAssembly is a huge step because you need to write your code in a LLVM language (eg: Rust, Go, Python, Kotlin, …) and then access it from the JavaScript.
Depending on your need, some free implementations exists such as Mediapipe initiated by Google and his trained models.
This article showed you the basics of building a video pipeline.
Except if you don’t want to rely on a third-party WebRTC solution or SDK, you will need to implement it because it is now a must-have in some verticals to deal with user’s privacy or simply to engage discussions as a “Meta” experience.